Friday, November 6, 2020

Stepping Out

On Saturday, November 7, I will redoing a facebook LIVE program demonstrating my new 10" Log Cabin Trim Tool Duo at a local shop in Virginia named Artistic Artisans. The facebook page is Artistic Artisans. Simply go to facebook and enter the name and you can easily find it. The live program starts at 9:30. See you there!

For a demo that lasts about 30 minutes, I needed to make "step outs" showing how to trim a Log Cabin blocking using the new trim tool. It took almost all day, but here are the step outs that I will be trimming tomorrow.


Starting at the bottom left:
1. Cut a precise 2-1/2" center square. Then cut 1-3/4" wide strips in white and green and 1-1/4" wide strips in beige and yellow. 
2. Sew (2) 1-3/4" white and (2) 1-3/4" green strips around the center square. I always add strips in a clockwise rotation. You can choose to add in a counter-clockwise direction if your prefer. Just be consistent and always go in the same direction as you add each round. Press and trim each round when it is finished using the 10" Log Cabin Trim Tool Duo.
3. Sew (2) 1-1/4" beige and (2) 1-1/4" yellow strips to the trimmed unit. Press and trim.
4. Continue alternating wide strips an then narrow strips in each round until the block finishes at 10". There are (3) rounds of wide strips and (2) rounds of narrow strips.  

It is easy and fun and you end up with a perfect block every time even if one of the strips is a smidge off when sewn in place. The great thing about the tool is this...if there is a small irregularity in the width of one of the stitched strips the trimming makes a correction so it is the perfect size before you advance to sewing the next round of strips. Without this small "as you go" correction the block can be very much out of whack when you finish the last round. The trim tool prevents this looming disaster. 


Wednesday, October 14, 2020

Making Progress

You would think in these stay-at-home days I would complete more than eight blocks in 10 days. Alas, I have had a lot of distractions.

After sewing 1 sample block I am ready to stitch in sets. I usually sew a set of 4 or 6 or 8 blocks in color family groups. I find this to be time saving and it keeps sets of identical blocks in order.


The 4 log cabin block with the dark sides were completed first, as my sample block is in this group. The 4 blocks with the bright sides were completed yesterday. The quilt I am making has 20 blocks so I have 12 blocks to go. My next group will have 6 identical blocks. The group after that will have 5 and there is one stand alone block for the center of my star so it will be a "one of". Let's hope I have more progress this week so I can complete the all the blocks next week.

Monday, September 28, 2020

Creative Process - Prep and Sew

Time to cut and sew a "test" block before cutting and sewing the blocks for the entire quilt. I always do a test block to make sure I have my cutting correctly figured for each of the strips in the block. The test block also helps in figuring the amount of each fabric needed to make the entire quilt. Note the finger protector. I sliced off the tip of my finger last February with my rotary cutter. A trip to the ER then a visit to a hand specialist at Johns Hopkins resulted. Diagnosis: finger tip amputation. It will never grow back. Now I use protection every time I cut. I have special finger bandaids I ordered from Amazon, the finger cot you see here, and sometimes I uses my quilting gloves I ordered from Leah Day. They all work to keep my finger safe. 


Sewing prep consists of arranging strips in a silverware divider tray to keep the prints and colors organized. 
  
Test block complete! Each row stitched and trimmed with the new 10" Log Cabin Trim Tool Duo. I compare the block to my printed illustration of the quilt to make sure I sewed it according to the plan. Satisfied, I will sew the remaining 3 blocks in this color combination. Then I will repeat this process for the remaining blocks in the quilt. Test block first, then all the blocks that match before moving on to the next group.

Thursday, September 24, 2020

A Quilt Design Journey

Starting today I am going to walk you through my design process for a new quilt. The first thing I do is work up my design on the computer using Adobe Illustrator. I have a MAC so I don't have the popular design program most people on a PC use. Here is the design I am getting ready to sew. The artwork has a few notations as to block size, number of blocks, all with labels to keep them in order. The blocks will be made using my new 10" Log Cabin Trim Tool Duo by Creative Grids.

The biggest decision is selecting fabrics. I decided to use some of my extensive collection of Kaffe Fassett fat quarters to make this quilt. 
Fabrics auditioned but not selected.

\
Final selection...I think

I have grouped the fabrics according to color assignments for the blocks. I will be adding solid light colors in white, yellow, orange, and either beige or grey to add contrast.

Now I am off to sew some blocks. Come back on Monday to see how they turn out. Sewing a sample block in each color family will determine if I continue with these fabrics...or not. 

Saturday, September 19, 2020

Log Cabin Duo YouTube Demos

There are 3 demos on YouTube showing how to use my new 10" Log Cabin Trim Tool Duo. I am really excited about this new tool. It is so versatile. Just open YouTube and type in creativegridsusa and you will go directly to the video demonstration that will show you how to make several variations on the basic 10" block using the one ruler. They are many demos for a variety of Creative Grids rulers on YouTube. You can also go to the Creative Grids USA facebook page to see more about the ruler and patterns. 

Support your local quilt shop by asking for this new ruler, the 10" Log Cabin Trim Tool Duo. If they don't have it you can order from my website: jeanannquilts.com 

Friday, September 18, 2020

NEW! LogCabin TrimTool Duo

For the past year I have been working on a new Log Cabin Trim Tool. Here it is, with the special features that advances this ruler into a new realm of log cabin possibilities. Visit my website to see ordering details: jeanannquilts.com


·      Fully illustrated step by step instructions

·       Two sets of markings - one for 1" logs and one for 1/2" logs

·       Make blocks with all same strip widths or combine the two widths

·      Cutting instructions for strip widths and center square printed on tool

·      Slides easily over fabric until pressure is applied

·       Exclusive grippers hold fabric in place while cutting

Projects and Patterns

Rick Rack Table Runner  Size: 18” x 54” 
This Way and That QuiltSize: 54” x 54”
Ring Around the Rosie ToteSize: 18” x 20”
Fly Away Log CabinSize: 54” x 68” 

Monday, September 7, 2020

Star Gazing

Star quilts have always been a favorite. I have two star quilts I gave to my daughter to display when she worked at the Air and Space Museum. The first quilt I named Rock n Roll and it incorporates a center Log Leg Star block surrounded by a border of Four Patch blocks and a final border of paper pieced New York Beauty blocks. This quilt measures 54" x 54". 

The second quilt is 24" x 24", a mini. I named it Syzygy. This is a rare occurrence that is an opposition alignment of the moon and sun that produces abnormally high tides. I loved the way the word, syzygy sounded and was spelled so I made the quilt so I could use the name. A quilter moon and seven stars are appliquéd in th center and the corners of the first border are rays of the sun bursting out to the edges. 

Wednesday, September 2, 2020

Hang it all...on the wall

 I m trying to find a place for all of my quilts. There are about 100 in my collection. I have quilt stacks on top of furniture, on beds and tables. Here are two more display solutions. 

My apartment has a 1950's kitchen. The appliances have been updated including a dishwasher. New formica is on the countertops. I still have a swinging door that I will never use to close off the kitchen from the dining room.  A defunct space heater is mounted to the wall next to the door. Cabinet space is limited. What to do? I put an over-the-door hanger on the now permanently open door and displayed my aprons. I placed an old oak bookcase in front of the heater to store kitchen collectibles and other items. I put my coffee cup quilt on the boring white wall. It's slightly hidden by the door but still effective. 


When you enter my apartment there is a sort of foyer space directly in front of the door. I placed a narrow table with family photos (my grandmother and grandfather and my father, age 5, in front). Turning to the right is a 10' long hall. Another quilt finds a home! At the end of the hall is a bench with my winter boots beneath just waiting for cold weather and a peg board to hang purses, baseball caps, and coats. Behind them is a photo of my great-grandfather's house. His name was Henry Hawley and he was a country doctor in Freeland, Michigan in the mid 1800's. (Yes, the 1800's not the 1900's.) The town was named for my family.


I used a jelly roll to make the quilt for my second book, Jelly Roll Jazz.

Friday, August 21, 2020

Tropical Quilting

Born in Michigan, raised in Palm Beach...Most of my memories are of 50 years in the tropics. I have two quilts made with the tropics in mind. Not far from my home in Florida was the home of the Orchid Society. They had a beautiful garden filled with all kinds of orchids. This is a larger adaptation of my Mirror Ball Dots quilt. I used a triple rail fence block to alternate with the circles in this quilt. Each of the appliqué dots features a different orchid plant. 

There were palm trees everywhere. We could pick up a coconut from the ground, bust it open with a hammer and screw driver to remove the husk. The coconut within had "eyes", little round circles that we punched open and drank the warm coconut milk on the spot. Next we cracked it open to pry out the coconut meat and have a nice tropical snack. 
Tropic Palms became a strippy quilt because I wanted to showcase the vertical pattern of he palm leaves printed in the fabric. There was very little piecing other than the Bachelor's Puzzle blocks in the center strip and the two vertical rows of Flying Geese units on each side. This is one of my favorite quilts. 

Monday, August 17, 2020

Stack 'em Up

Except for hanging a few pictures I have settled in after moving. I have been busy folding and stacking all my quilts that aren't on my bed or hanging on walls. The quilts are in my new office space (originally the formal dining room). My dining area is at one end of the very large living room. Quilting is definitely more important than eating. 


On the left, is a section of my large bookcase that has my quilting books, antique toy sewing machines, fabrics and other quilting related materials. The hoosier holds my precuts, and my printer. A stack of quilts tops it off. On the right is a metal rack taken from the walk-in closet of my former apartment and repurposed to hold stacks of small quilts and my McCoy tea set. A very small framed photo of me as a four year old living in Michigan shares the same shelf. My computer desk is in the dining room along with a table I plan to use for You-Tube demos of my Creative Grids rulers sometime this fall. 

Thursday, August 13, 2020

Round Robin Quilts

 Several years ago there were quite a few groups on the internet doing Round Robin Quilts. Here are quilts from my Round Robin Quilt groups. Since many of us are still staying very much at home, this is a good way to quilt in a group. 

Birdhouse blocks were popular at the time and my flirtation with log cabin blocks is represented with the center log cabin birdhouse in the quilt on the right.

My friend Debby Kratovil was one of the quilters contributing to the Noah quilt.

Most of these groups were made up of 4 to 6 quilters. We had a list in order of who received the quilt after we added our part. We also indicated if a border or more blocks were to be added and if piecing or applique was used to make the next round. Each group made up their own rules. Mostly the rules were followed but sometimes not quite...it didn't matter, we were very forgiving if someone did their own thing.

Monday, August 10, 2020

A Tiskit A Tasket...Lets quilt Baskets

Baskets organize things, they collect things, they gather things. They also provide inspiration for quilters who have designed many basket patterns.

I have always loved basket quilts as have many quilters now and in generations past. The flower basket quilt shown above is a simple basket and the appliqué flowers in the basket were fussy cut from the border fabric. The quilt and pattern are in the first Circle of Nine book that my sister, Janet Houts, and I wrote together. www.jeanannquilts.com. In all we authored three Circle of Nine books. 

This is a basket quilt I made in a machine embroidery workshop at John Campbell Folk School in Tennessee. The flowers were cut from a printed chintz fabric, appliquéd in place and then various colored threads were used to execute machine thread embroidery over the chintz, using the print as my pattern to follow as I stitched. The basket pattern is called "Cake Stand".

Monday, August 3, 2020

Moving Day - Setting up

On July 29 I moved to a new apartment. It is larger and has a view of the Glover Archibald Park. Yesterday I saw a deer, right in downtown Washington DC. I have repurposed the dining room into an office and studio where I can make demo videos of how to use my rulers. Here is the new office space (minus the studio set up).


The quilt on the wall is Smokey Mountain Sunset. The photo on the right was taken by Kelly Wilkes for my book Little Log Quilts. The quilt uses the 6" Log Cabin Trim Tool. Book and tool can be ordered on my website: jeanannquilts.com

Monday, July 27, 2020

Inspiration...Mirror Ball

Inspiration for a quilt can come from many places. In Lake Park, Florida the old city hall had offices on the first floor and an assembly room on the second floor. Way up high in the assembly room was a mirror ball that lit up the room when community dances took place curing the mid 20th century. In the late 20th century I went there weekly to play bridge. I thought of that mirror ball when I was challenged to make a quilt using a collection from Free Spirit fabrics that featured shiny dots. 
 

Here is a similar ball and the quilt I made and named Mirror Ball Dots. It is a simple quilt using 4" Pinwheels and simple Square on Square blocks with appliqué circles. A four patch border with smaller circles randomly scattered frame the center. Little did I know that many years later I would design a Square on Square Trim Tool for Creative Grids that would make both blocks. I used water glasses as templates to make the appliqué circles. 

Thursday, July 23, 2020

Nostalgia

This week is about fabric collections and Nostalgia. Several years ago I designed two fabric collections for a now defunct fabric company. I made two quilts from the first collection that I called Charleston. The second collection called New Orleans was barely out on shelves when the fabric company folded. Here re two quilts I made from the Charleston collection.
                            Log Cabin - Barn Raising version                              Album Quilt

And...3 more that I designed and cerated as virtual quilts...traditional quilts for a traditional fabric collection. It was fun, but a lot of work and research. I love equally vintage fabric collections and the new modern fabrics. Most of my quilts fall into one of these two categories. 


Monday, July 20, 2020

A Happy Accident

Remember that slogan, "Make lemonade out of lemons"? This is what happened in putting this quilt together. It is one of the last quilts I co-made as editor-in-chief of QUILT magazine 15 years ago. My original design called for 9 blocks set on point separated by rail fence blocks. Alternate blocks were to be plain muslin fabric. The flower designs were taken from the actual fabric (with permission). Somehow only 8 blocks were finished. I then sent the blocks home with my sewist, Jan Crandall, to be set into the quilt top. With only 8 blocks (the 9th block went missing) Jan crafted this original and unique setting that is a little like a puzzle. The setting happily eliminates the boring fabric only squares we often see in quilts that are set "on point".
The quilt uses a collection of fabrics by Kim Schaefer, one of my favorite fabric designers for Andover Fabrics. Kim has also authored quilt books published by C & T Publishing. Kim has her own company and website Little Quilt Company.
Another fabric collection by Kim is the Christmas fabric used in the Christmas quilt I featured last week. A reminder, while a pattern is not available, the actual quilt is available for sale in my Etsy shop. It appeared as a cover quilt on a long ago special issue by The Quilter magazine. 

Friday, July 17, 2020

My best bed quilt

Several years ago I made this bed quilt using a collection of fabrics by Amy Butler. The easy-to-make block in this quilt is the Comfort Block and the finished size is 20". It doesn't take many of these blocks to make a quilt. There are no triangles, only squares and rectangles in this block.
Amy Butler Comfort Quilt

I liked making this quilt so much that I made it a second time in colors for my bedroom. Yellow is sunshine and I like waking up to a happy environment. This time the quilt appears on the cover of The Quilter magazine. In this version of the quilt I alternated the Comfort Block with Pieced Star blocks. 


Sunshine and Stars Comfort Quilt

Wednesday, July 15, 2020

Paper Piecing

Remember the days when paper-piecing was all the rage? It may no longer be "the rage" but it still has an important place in quilt making. There are some quilt projects that are simply better when paper pieced. Yesterday I was challenged to gather some info on offering downloadable PDF patterns on Etsy. I went deep diving into my vast inventory of quilts I designed while Editor-in-Chief of QUILT magazine. Sadly, QUILT has gone the way of many magazines and is now out of print. But I did save my files and patterns to use "someday". That day has arrived.
The Library Quilt
This is a miniature quilt, finished size is 26" x 26". The very small blocks are best when paper-pieced. The pattern is 8 pages long as each block is indeed a separate paper-pieced block. This is a great project to use up all those little scraps that you just can't bear to throw away. The piecing is perfect in each block due to the technique. The pattern is available in Etsy. You don't have to wait until the pattern arrives by USPS, you can simply pay, download, and start sewing today.

Friday, July 10, 2020

Christmas Nights

Here is a Christmas quilt I made several years ago with Andover fabrics for one of the popular quilting magazines. I forgot which magazine. The blocks are very simple with a triangle tree and a Sawtooth Star. There best thing about this quilt is that it brought one of my best friends from high school and myself back together again. We lost track as I stayed put in West Palm Beach and she moved frequently with her Coast Guard family and their four children. We remain good friends today.
Christmas Nights
I am putting this quilt for sale on Etsy later today. I am asking $75.00. It could be yours.

Tuesday, July 7, 2020

If It's July...Thhink Christmas

Christmas in July is a popular promotion in quilt shops. Quilters need to get an early start if they want a quilted accent for their holiday decor. Quick and easy is the way to go for projects that will be displayed during a short holiday season. Here are two patterns, big and little, that  I designed and stitched for my own home. You can trim these trees with all kinds of findings like buttons and beads and glittering sew on charms or crystals. Let your children or grandchildren help by picking and placing the decorations for you to sew or glue in place.
Trim the Tree in miniature...wall hanging and table runner

Trim the Tree with 8" blocks...wall hanging
Of course, both patterns are available on my website...jeanannquilts.com. and my in Etsy shop. The miniature version uses the 4" Curvly Log Cabin and standard 4" Log Cabin. 

Thursday, July 2, 2020

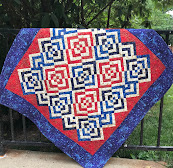
More Red White and Blue

Quilt blocks are fun decorating projects. Here is a pair of pillows I made in mostly blue, but with a punch of red. I used the 8" Curvy Log Cabin Trim Tool to make the pillows. A quick and easy one-day project that has produced months of decorative pleasure.
A pattern for the pillows is in my Etsy shop. https://www.etsy.com/shop/JeanAnnQuilts?ref=seller-platform-mcnav