Thursday, May 28, 2020

Little Log Cabin Quilts

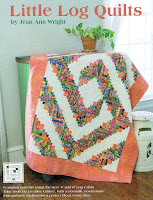
I really love making little quilts. They can look just like big quilts but they are made with mini blocks. These blocks can be 4" or 6". A couple of years ago I self-published a book named Little Log Quilts. Here are a couple of my favorite quilts and the cover of the book.

My friend Debby Kratovil (Quilter by Design) quilterbydesign.com is featuring little log cabin quilts on her website this week. She has made dozens and many of them have been made using my Log Cabin Trim Tools. Debby has patterns for the quilts she is featuring. All of her patterns can be found on her website and in her Etsy shop. 

I am offering a special for the month of June on my website jeanannquilts.com. If you purchase BOTH of my rulers to make little log Cabin quilts - the 6" Log Cabin Trim Tool and the 4" Log Cabin Trim tools, the Little Log Quilts book is my gift to you at no cost. Caution: When filling out the order form place the order for ONLY the 2 rulers. Do not order the book as you will be charged for the book if you put it on your order form. I will automatically include the book when you order the rulers. This offer is only for the month of June 2020.

You can also order both rulers from my Etsy shop (you can get there from my webpage) , and the same book special applies.

Monday, May 25, 2020

Stack #6 - Make This.Charm Quilt

This is the last stack. When I started the stacks I thought I had 5, but there were 2 hidden stacks. These are my smallest quilts. I love the little Birds In Air quilt so I decided to share the instructions with you. They are to-the-point, but are detailed enough for most quilters to follow. This quilt can be made with purchased 5" charm squares or you can cut your own.


Birds In Air  - Quilt Size: Approximately 19" x 25" --- Block Size: 4-1/2"

Materials: 1 pack of precut 5" charm squares. 2/3 yard black fabric and 2/3 yard backing fabric.
  1. Cut (9) print 5" charm squares in different colors and prints to make the triangle units. 
  2. Cut (9) black 5" squares. Stack (1) black square and (1) charm square with right sides together. 
  3. With a white or grey pencil draw 2 diagonal lines on the wrong side of the black squares. Stitch 1/4" on each side of the diagonal lines. 
  4. Draw a vertical line and a horizontal line down the center of each square for straight lines.
  5. Using scissors or rotary cutter cut apart on the diagonal lines and the straight lines.
  6. Fold the resulting triangle open and press seams towards the black fabrics. You should have (72) half-square triangle units that are 2" in size (they will sew into 1-1/2" units in the blocks).
  7. Using (9) charm squares cut each square into (4) 2" squares for a total of (36) 2" squares.
  8. Referring to the block diagram join the half square triangle units and squares into (12) blocks. 
  9. Cut (9) short sashing strips 1-1/2" x 5. Referring to the quilt photo, make (3) vertical rows alternating (4) blocks and (3) sashing strips in each row. Make 3 rows.
  10. Cut (4) vertical sashing strips 1-1/2" x 18" for vertical sashing. Alternate and join together (4)vertical sashing and (3) vertical block rows. Cut 2 long horizontal sashing 1-1/2" x 23-1/2" for top and bottom. Join to the quilt. 
  11. Cut remainder of charm squares into (3) 1-1/2" x 5" pieces. Join pieces together round outside edges, trimming lengths to fit as necessary.
  12. Layer quilt top, batting and backing, quilt layers together. Cut (30 2-1/2" X WOF (42") strips for binding to finish the outside edges. 

Friday, May 22, 2020

OOPS! Sofa Stack #5-1/2

I opened my linen closet door to get a precious roll of toilet paper and realized I was skipping the stack of quilts stored there. These are quilts I use from time to time...on the sofa, on the bed, over my lap in my favorite chair. So I cam calling this my Sofa Stack #5-1/2. Many of my quilts are never used. The quilts you have seen so far have all been made for my patterns and my books. Here are the well used and well loved quilts and some pillows.

Monday, May 18, 2020

Quilt Stack #5

Quilt Stack #5 is a very short stack because I don't often make full size quilts. With only 1 bed in my apartment, I only need a few big quilts. The quilts are stacked on top of my antique Hoosier with the shelves holding part of my collection of pre-cuts. I love to make scrap quilts and I have discovered that using precuts allows me to have a variety of prints without buying and  storing yardage.

While waiting their turn to become a quilt, the precuts make a pretty display.

Thursday, May 14, 2020

Quilt Stack 4

Nearing the end of the quilt stacks. This is stack #4 and we just have stacks #5 and #6 to go. This stack has small quilts, table runners and bed runners. It is at the end of my cutting table with my parking station for rotary cutters and a few of my many, many Creative Grids rulers. I have patterns for some of these quilts on my website jeanannquilts.com
 
Most of the quilts in this stack are in my book Little Log Quilts, also on my website. I love making the small quilts because many times I am captivated by a design idea, I don't want a bed quilt, I just want to work out the colors and fabrics, so a quilt with 4" to 6" blocks works perfectly.

Monday, May 11, 2020

Too Many Blocks...Is It Possible?

A few years ago I designed a Creative Grids ruler to make "curvy" log cabin blocks. I was so enthusiastic about making the blocks I over-sewed the number needed for the cover quilt making four too many. In my stay-at-home boredom I began cleaning the sewing room. I found the extra blocks and spent a morning making a throw pillow to go with the quilt.


The pillow has joined the quilt on my sofa. I took the photo with my Mother's Day gifts nearby. Flowers from one daughter and (because of the weird toilet paper hoarding), six rolls of Charmin from another daughter because my grocery delivery service s unable to deliver this product. She says there is plenty of TP in North Carolina. Alas, I am in DC. 

The book and the Creative Grids ruler to make the quilt is available as a featured product on my newly designed website: jeanannquilts.com

My pillow is 16" square. My secret for making quilted pillows...using traditional piping to finish the outside edges is a challenge. Here is how I do it.
  • Quilt the blocks first using just the block and batting (no backing fabric).
  • Cut two pieces of fabric for the back of the pillow. Each piece was 16-1/2" x 10-1/2".
  • Hem one long side of both backing pieces.
  • Layer the quilt top, and the two backing pieces overlapping the hemmed sides in the center.
  • Here is my SECRET! Bind the pillow top and backing pieces together around all four sides just like binding a quilt.
  • Stuff the pillow form into the opening in the back where the pieces overlap. 
  • Use a blind hem stitch and sew the opening together by hand. This can easily be removed to wash the pillow cover.

Friday, May 8, 2020

Quilt Stack 3

This stack has smallish projects. Table runners, smaller wall quilts, etc are stacked on a shelving unit that also acts as a "hang-up" for my Creative Grids rulers. I hang my tote bags from the top of the unit. the unit itself hold bins of fabrics, boxes of thread and other bits of sewing stuff.


The bags are made using my mini log cabin and mini pineapple rulers. Using the rulers promises perfect blocks and quick sewing. I use the same method for all my totes,, no zippers and a quick method for sewing gussets at the bag bottom and adding bag handles (no turning inside out). Patterns available on my new website: jeanannquilts.com

Saturday, May 2, 2020

A Zoom Wedding

This afternoon (Saturday 2 May) I am going to a ZOOM wedding. My granddaughter and her fiancé have decided to tied the knot on their original choice of a date. Only 10 people can attend, limiting it to the minister, the engaged couple, moms and dads, plus brother and sister. The rest of the family has been invited to attend via ZOOM. Not the wedding that was planned but still a wedding that is greatly celebrated. The bride is a childhood cancer survivor so this is a double celebration. Naturally, I made a quilt for them. The rest of the family and all the invited guests will attend the reception and other previous planned events in September--a two part celebration.
Color Fusion quilt for Madeline and Thomas

Close -up of quilt. Featured in my book, Jelly Roll Jazz

Here are photos of the wedding. Thomas and Madeline....